

Designing An Augmented Reality App
Designing for augmented reality: what are the differences?
![]()

D esign, in many ways, used to be so much simpler. When you designed something on print, you knew the design was always going to show up the same way each time. Then along came computers and the internet, and a whole host of new challenges appeared. Designers had to start thinking about interaction a lot more, and if they weren't, they were left behind in a flurry of WordArt and tiled psychedelic backgrounds. With all this new technology, users needed their handheld to help them navigate this new digital frontier. A new system was created, a new language to talk to people using design. Since then, we've had new systems come along that have required this language to be updated, such as smartphones. During all of this, the concept of 2D screen interaction has stayed the same. That is, until now.
Augmented and virtual reality are here, and in a big way. Nearly a billion people currently use augmented reality, and this is projected to grow to nearly two billion in the next five years. Yes, I know people sitting around in VR headsets look silly. Yes, I know we already spend too much time on our phones and don't need another reason to get even more addicted. Yes, I know that designing for VR and AR presents a whole new set of challenges and adds complexity to an already complex job. Like it or not though, they're here to stay, and have already seen plenty of amazing applications. All I'm saying is, maybe now is a good time to get in on the ground floor of designing for an emerging technology? As an AR developer myself, I have found that a lot of the design considerations for extended reality can be boiled down to a few simple concepts.
Step 1: Use physical interactions where possible
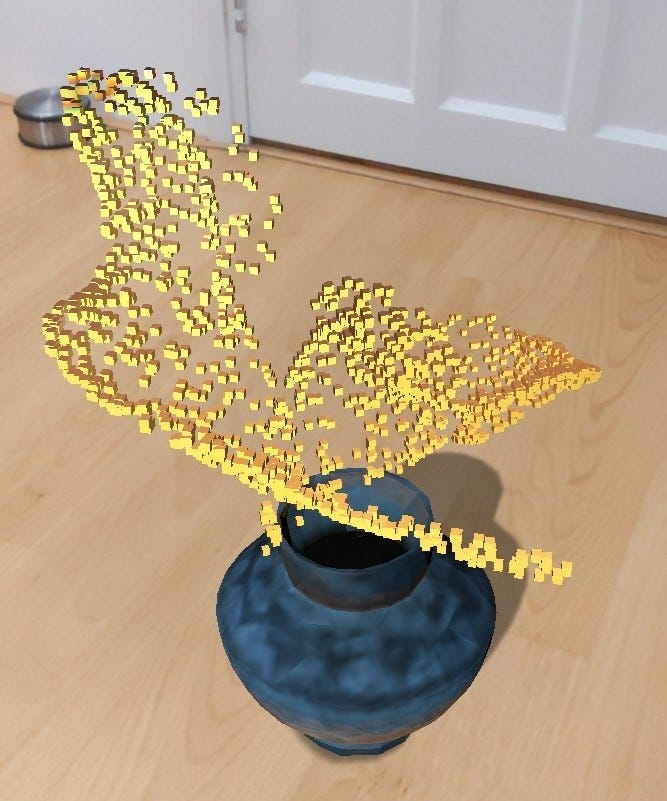
Most AR at the moment is restricted to mobile. Sure, there are some people with headsets, but those are still at the bleeding edge of technology. Consequentially, when designing an AR effect, it can be tempting to fall back onto mobile UX features for interaction, such as tapping and swiping. In a way this is good, as it relies on what the user already knows. However, to make an AR effect feel truly interactive and fun, it often helps to incorporate interactions that occur not on the 2D screen, but in the "real" world. Take a look at the below example I made:
The holographic info displays appear when the user gets close to them, and disappear when the user retreats. This helps the user to feel more like they are in the space and encourages them to move around. Be careful, however: it must be obvious that this interaction can occur otherwise it might be missed. It's best to either display instructions on the screen at the start or, ideally, show the user when they first open the effect. In the above example, the effect occurs when the user walks through the doors, as the first exhibit is close to the entrance. This is one of the interesting things about AR design: it often necessitates thinking in the 3D space, and so uses many aspects from other fields such as interior design and architectural design.
Step 2: Entice the user

Most AR at the moment comes in the form of social AR. That is, filters for platforms like Instagram, Snapchat and TikTok. On these platforms, the number of AR effects that users can choose from is huge, as it is easy to browse through effect libraries, trying out a new one every few seconds. This means that it's super important to peak the users interest as soon as they start using your effect. A good way to do this is to tantalizingly hint at more content to discover. In the above effect, I used a portal as a way to display a "painting" in 3D. The user can see the painting on opening, but they are also enticed to "step into" the painting and look around, thus increasing the engagement time.
Step 3: Don't try to do everything at once
As well as being good general life advice, it also applies to AR. It is possible to create huge, complex worlds in AR, and phone screens are only so big. While some effects might warrant having detailed worlds to explore, many times, especially when explaining things, it's best to segment information into multiple parts (much like I'm doing with this article). Take a look at the below effect I made about the reintroduction of bison to Europe:
Each step has a different animation, and a different portion of information. This helps to tell a story to the user. Additionally, this is often beneficial for performance reasons: having too much on a phone-based AR effect might slow it down too much.
Step 4: Put text in the world if you can
Another thing you might have noticed with the above examples is that they use informational displays that are in the physical space, not on the orthographic (2D UI) layer. This can be a great way to get the user to engage more with your effect: if the user is reading something in physical space, they are looking at the world you have created. If the user is reading something on the orthographic layer, they are looking "above" your effect. This is something to be careful with, however, as text is normally less obvious and harder to read if it's in the 3D world, so it's best to put important text (like brand names or instructions) in the orthographic layer or in a very obvious 3D place (attached to the user's face, for example).
Step 5: Look amazing
Again, something that also applies to everyday life. In AR this is especially important though. Sure, it's also good practice for websites to look amazing, however in my opinion, websites can also get away with more minimalism (being 2D mediums). AR effects are superimposed onto the real world, and so they should look like they belong there. If they have some sort of surreal element to them, this is even more important, as it helps ground the effect. Take some time to either make some great models/animations in 3D software, or find some lifelike 3D assets online (there is a great free collection of public domain objects at Sketchfab).
Step 6: Always spark joy
Above all, AR experiences should be fun to use. They enable the impossible to become possible. They can bring outer space to your kitchen, or a rock concert to your living room. The most successful effects I have made are the ones that I have also had most fun using, like the below "ship in bottle" effect.

In the end, augmented reality isn't about escaping life, it's about improving it. If you take away anything from this article, it should be this: when something is fun, people will want to use it, and you will see more results. So try and have fun. I guess that one also applies to life as well.
Designing An Augmented Reality App
Source: https://uxdesign.cc/how-to-design-ux-for-augmented-reality-in-seven-simple-steps-d245fb8dbf2a
Posted by: aguilarsals1979.blogspot.com
0 Response to "Designing An Augmented Reality App"
Post a Comment